Has anyone ever forgotten their keys so they couldn’t get in the house in the middle of the night, or had the keys carelessly locked in their room? Most of us have no choice but to turn to a locksmith for this kind of situation. In fact, we can learn the skills to pick locks by ourselves, and learn how to get Lock Picks Tool with a wire. The next time we encounter this kind of thing will not be so embarrassing.
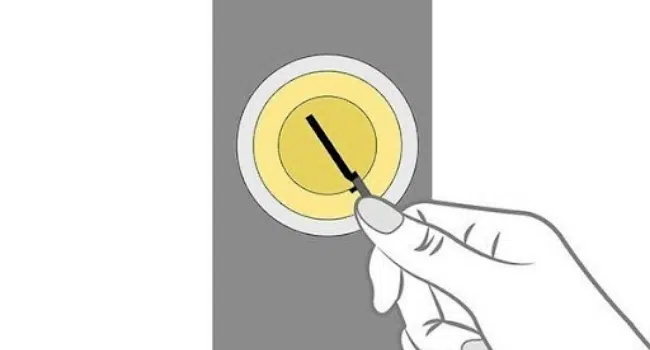
These locks are relatively easy to open, usually with a lock pick set and a wrench or a piece of wire, and these tools are often easy to find. To open a lock, you need to insert a thick metal rod or needle into the hole, and then slowly turn them, with patience, until you hear a click. The following steps will explain in detail how to use wire to open locks.
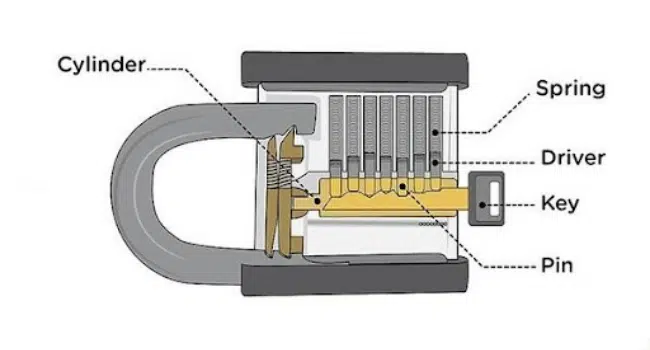
First, understand how the lock works. The lock has a small cylinder inside and a shell that rotates inside the shell (see picture below). When the lock is closed, the lock is held in place by pairs of metal pins (known professionally as pins), the top of which is inserted between the lock and the casing, thus securing the lock. When a suitable key is inserted, it pushes the pin back so that the lock is free to turn, resulting in the lock being opened.
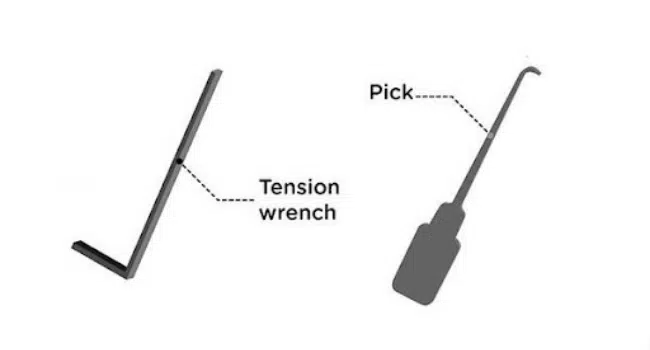
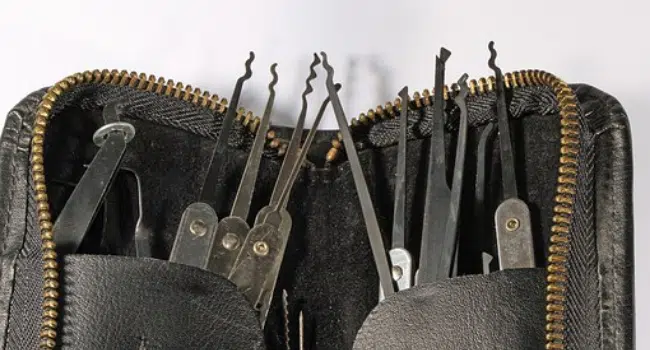
Buy lock pick set and a torque wrench. Different sizes of lock picks have specific uses. A torque wrench, or torque wrench, is used to twist the lock by force. Professional-grade picks and torque wrenches are typically sold in packs (pictured), but many lock pickers have their own tools saved up.
Clamp the torque wrench to the lower part of the keyhole.
Make clear which direction the lock core should be turned to open the lock. If you’re familiar with the lock, you’ll know which way to turn it, but if you’re unfamiliar with the lock, there’s a way to do it. Torque wrenches come in handy. You twist the lock with a wrench and turn it clockwise, then counterclockwise. The lock can only turn a little bit before being locked. You need to feel the intensity of the lock when it stops. If you twist it in the wrong direction, it will be very dead and hard to stop. If it’s in the right direction, it won’t be as exciting.
5 Apply a light torque to the torque wrench in the right direction and hold. Different locks and even different marbles require different amounts of torque, so it’s a bit of a trial and error, but it’s a bit lighter to start with.
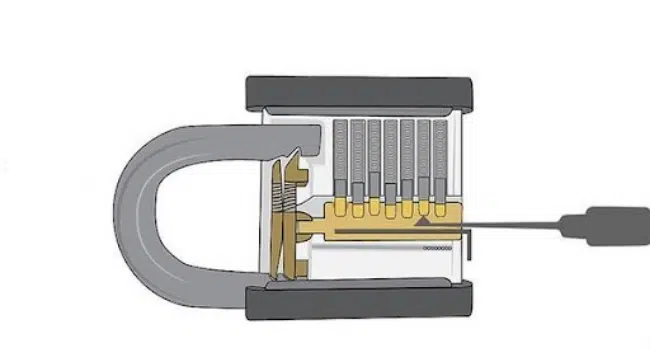
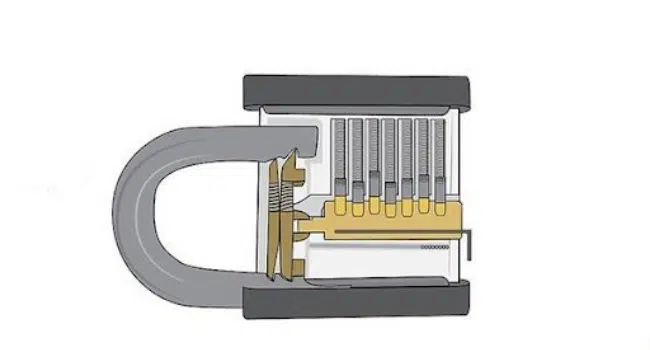
Insert the Lock Pick Tool into the top half of the keyhole to feel the presence of marbles. You need to tilt the Lock Pick Tool up and try to touch the marbles one by one. You can top the marbles first, and then feel the way they bounce off when the thrust is removed, and notice that all the marbles have to be topped off one by one. Feel which marbles are the hardest to hit in the process. If you feel comfortable enough to go up, use a wrench to apply more torque; and if none of them move, release some torque. Or if it’s too much trouble, you can “hit” all the marbles first.
When you find the hardest marble, start cracking it. Apply just enough force to offset the pressure exerted by the spring above it. Remember, the root marbles here are actually a pair. Your lock picker is actually pressing against the bottom marble and then applying upward force to the top marble. Your goal is to push the top one out of the lock completely. At this point, if you do not apply force again, the pin below will snap back into the lock, but the lock has been shifted by the torque of the wrench, and the pinholes that used to align between the lock and the case are not aligned. So that the top marble does not fall into the original hole, but onto the lock barrel. You should hear a very faint click, the sound of a marble hitting the wall of the lock. Then you try to push the ball up against the bottom one. If you do not feel the rebound force, you have successfully pushed the top one up.

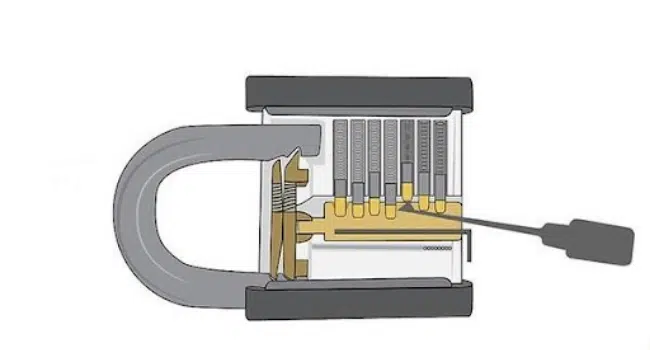
Then continue and applying torque to the core and repeating the last two steps until all the marbles are jacked up. Make sure you don’t lose the torque, or your previous work may be wasted, and you may need to adjust the torque for different shots.
Turn the lock core with a torque wrench to open the lock. When all the marbles are finished, you can turn the lock. God bless you that you have determined the right direction of rotation. If it happens to be the wrong direction, sorry, all the marbles will bounce back and start all over again.
If you do not want to use the iron wire to DIY lock picks, you can directly choose to buy Lock Picks for Sale at lockpickmall.com, which will cost you less much than others! Owning a lock pick set, and you don’t need to worry about being locked out!
Read more on KulFiy
Are Keyless Locks the Right Security Solution for You?