
Table of Contents
A family photo wall often begins with a picture everyone likes and ends with a rectangle the room can actually spare. The awkward part sits between those two decisions. If you tell a poster tool to make an image four sheets wide, you still do not know whether the assembled result will clear the light switch, stay above the sofa, or fit inside the taped boundary. Starting with rasterbator changes that order: measure the wall first, then ask the tool to plan the sheets around the finished width and height.
Rasterbator runs in the browser and turns one image into a labeled, tiled PDF for an ordinary printer. Its useful advantage for home projects is the Exact size option. Paper size controls each printed sheet, while the Width and Height fields control the assembled poster. That distinction keeps a decorating decision in centimetres or inches instead of turning it into a guess about page counts.
Mark The Wall Rectangle Before Choosing Any Paper
Put painter’s tape around the area the finished photo may occupy. Measure the inside of that rectangle, not the full wall and not the distance between two pieces of furniture that might move. A 120 by 80 centimetre opening is a real constraint. “About four pages across” is only a description of a possible print grid.
This first measurement prevents a common waste cycle. A person exports a poster by sheets wide, prints the stack, and discovers that the assembled image crosses a socket or leaves an odd strip beside a frame. The pages may be perfectly printed, yet the project still fails because the chosen grid decided the final size by accident.
Make one more check from the normal viewing position. A rectangle that feels balanced while you stand beside it may crowd the room when seen from the doorway. Move the tape now if necessary. Shifting four light strips of tape takes minutes; trimming and rejoining a full poster creates avoidable rework.
Record Width Height And Safe Clearance
Write down the desired finished width and height, then subtract any clearance needed around a shelf, switch, thermostat, or frame. Keep that note beside the printer. It becomes the reference for the setup screen, the downloaded guide, and the final wall check. If those three places disagree, stop before using the whole paper stack.
Decide Whether The Photo May Be Cropped
A wall rectangle and a source photo often have different proportions. A wide family group may need to fit a taller space; a portrait may need to fill a broad panel. Exact size makes the physical boundary explicit, but you still have to decide what happens to the picture inside it.
With Keep image proportions cleared, Rasterbator presents two practical choices. Show the whole image preserves every visible edge and can leave unused space within the chosen rectangle. Fill the poster uses the full width and height but may crop part of the source. The right choice depends on the photograph, not on which preview looks larger.
Protect Faces Hands And Meaningful Edges
Inspect the crop around faces, hands, dates, and objects that carry the memory. A missing elbow may be harmless. Cropping a child at the edge of a group or cutting the handwritten date from a scanned photograph changes the image. Move the crop or accept a border before exporting. Do not plan to recover lost content while trimming paper.

Build The Exact Size Poster With Three Workflow Steps
The workflow stays short when the wall measurement drives every later decision. You do not need to calculate a page grid by hand. The tool can place the requested rectangle inside the smallest complete grid that works with the selected paper and orientation.
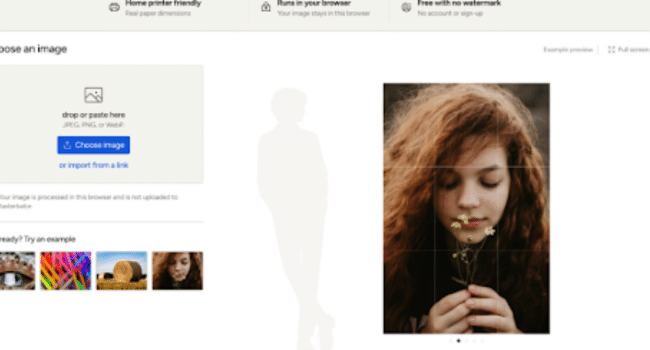
- Choose the image. Use a JPEG, PNG, or WebP from the device, or a CORS-enabled image URL. A device file remains in the current browser session.
- Set the physical result. Open Poster setup, choose the paper and orientation loaded in the printer, then select Poster size, Exact size and enter both finished dimensions.
- Review before export. Check the displayed poster size, paper use, page count, and effective resolution. Open Printed sheets and inspect corner pages before moving to Review & download.
Use the same unit throughout the job. Converting a wall measurement from centimetres to inches in your head invites a small error that becomes visible across the whole grid. Read the finished size back from the summary and compare it with the note beside the printer. That is the first cut-free approval point.
Let Paper Count Follow The Wall
This is where the rasterbator earns its place in the project. A sheet-count-first tool asks how many pages you want across or down and lets that choice approximate the outcome. Exact size reverses the dependency. The wall dimensions stay fixed, while the system works out the paper arrangement and physical offsets needed to produce them.
Choose Seams That Match The Photograph
The finished dimensions do not decide how the joins should look. A seamless poster can use Overlapping edges, which repeats a narrow image strip to make alignment easier, or Edge-to-edge, which joins unique image boundaries directly. A Framed grid keeps deliberate space between panels and can add a matching outer border.
Family photographs usually punish sloppy seams around eyes, mouths, and straight furniture edges. Overlap gives you more help during alignment, but it also asks you to trim and cover the repeated strip correctly. A framed grid can turn the joins into part of the design, especially when the source already feels like a collage. Select one method before export and follow that same method through the whole assembly.
Lay the printed pages on the floor in label order before trimming. If a face crosses a busy join, you can still return to the workspace and adjust the crop or choose a framed layout. Once the first cut removes a guide or image strip, that decision is harder to reverse. A misplaced seam can make an eye or date unreadable even though every page came out of the printer cleanly.

Measure One Guide Before Printing The Family Wall
Download the Print & assembly guide with the PDF. Print that single page using the same paper, orientation, viewer, and printer planned for the poster. Choose Actual Size or 100%, disable Fit, Shrink, and automatic scaling, then measure the ruler in the guide’s upper-right corner.
If the ruler is wrong, fix the print settings rather than changing the poster dimensions. If trim marks sit inside a printer’s non-printable edge, increase the page margin and export again. Rasterbator can preserve the requested geometry in the PDF, but the printer driver can still scale or clip it.
Keep the exported PDF and guide after assembly. The browser does not provide a cloud project history, so a closed tab cannot recover the setup. Those two files preserve the page labels and physical plan if one sheet tears during mounting or needs a clean reprint later.
For a one-off family wall, the best result is modest: the taped rectangle, the setup summary, and the measured guide all agree before the full stack enters the printer. Rasterbator suits households that want control over a specific wall space and are willing to trim and assemble pages. A print shop remains the easier route when mounting, colour matching, or a single seamless sheet matters more than home control.